Test video bitrate on Netflix and Max cheap tiers
I test streaming gear and services for a living, and I’ll be blunt: resolution labels are the easy part. Bitrate is where the compression bill shows up. A 1080p stream with healthy bitrate can look clean. A 1080p stream starved for data can smear dark scenes, flatten skin texture, and turn fast motion into mush. Netflix gives you a real diagnostic path. Max makes you work for it.
The reality of bitrate caps on budget streaming tiers
Start with the plan limits, because no diagnostic overlay can magically exceed them.
Netflix’s Standard with ads plan is capped at 1080p. Netflix Premium supports up to 4K UHD. Max works the same way in broad terms: Ad-Lite is generally capped at 1080p, while Ultimate Ad-Free is the tier required for 4K UHD content.
That does not mean every 1080p stream looks identical. It means the ceiling is lower before the stream even starts. Bitrate then moves inside that ceiling based on the title, scene complexity, device, network, and the service’s own adaptive streaming logic.
Here is the practical difference:
| What you are testing | Netflix Standard with ads | Max Ad-Lite |
|---|---|---|
| Resolution ceiling | 1080p | 1080p |
| 4K access | No | No |
| Native user-facing bitrate tool | Yes, on many TVs/devices and browsers | Not generally available |
| Browser diagnostics | Ctrl + Alt + Shift + D overlay | Browser developer tools workaround |
| Ease of testing | Relatively clean | Annoying but possible |
| Best use case | Quick proof of delivered resolution/bitrate | Rough estimate of stream behavior |
The cheap tiers are not scams. They are constrained products. That matters. A 65-inch TV at eight feet will expose compression faster than a 13-inch laptop. Dark prestige drama will show weakness faster than a bright sitcom. Sports and action punish low bitrate harder than talk shows.
The plan badge tells you the ceiling. Bitrate tells you how hard the service is hitting that ceiling.
This is why I don’t judge these plans by app homepages or thumbnail quality. I judge them during motion, in shadows, on real hardware, with diagnostics open when possible.
Accessing Netflix diagnostic overlays on smart TVs and browsers
Netflix is the easier service to audit. Not perfect. Easier.
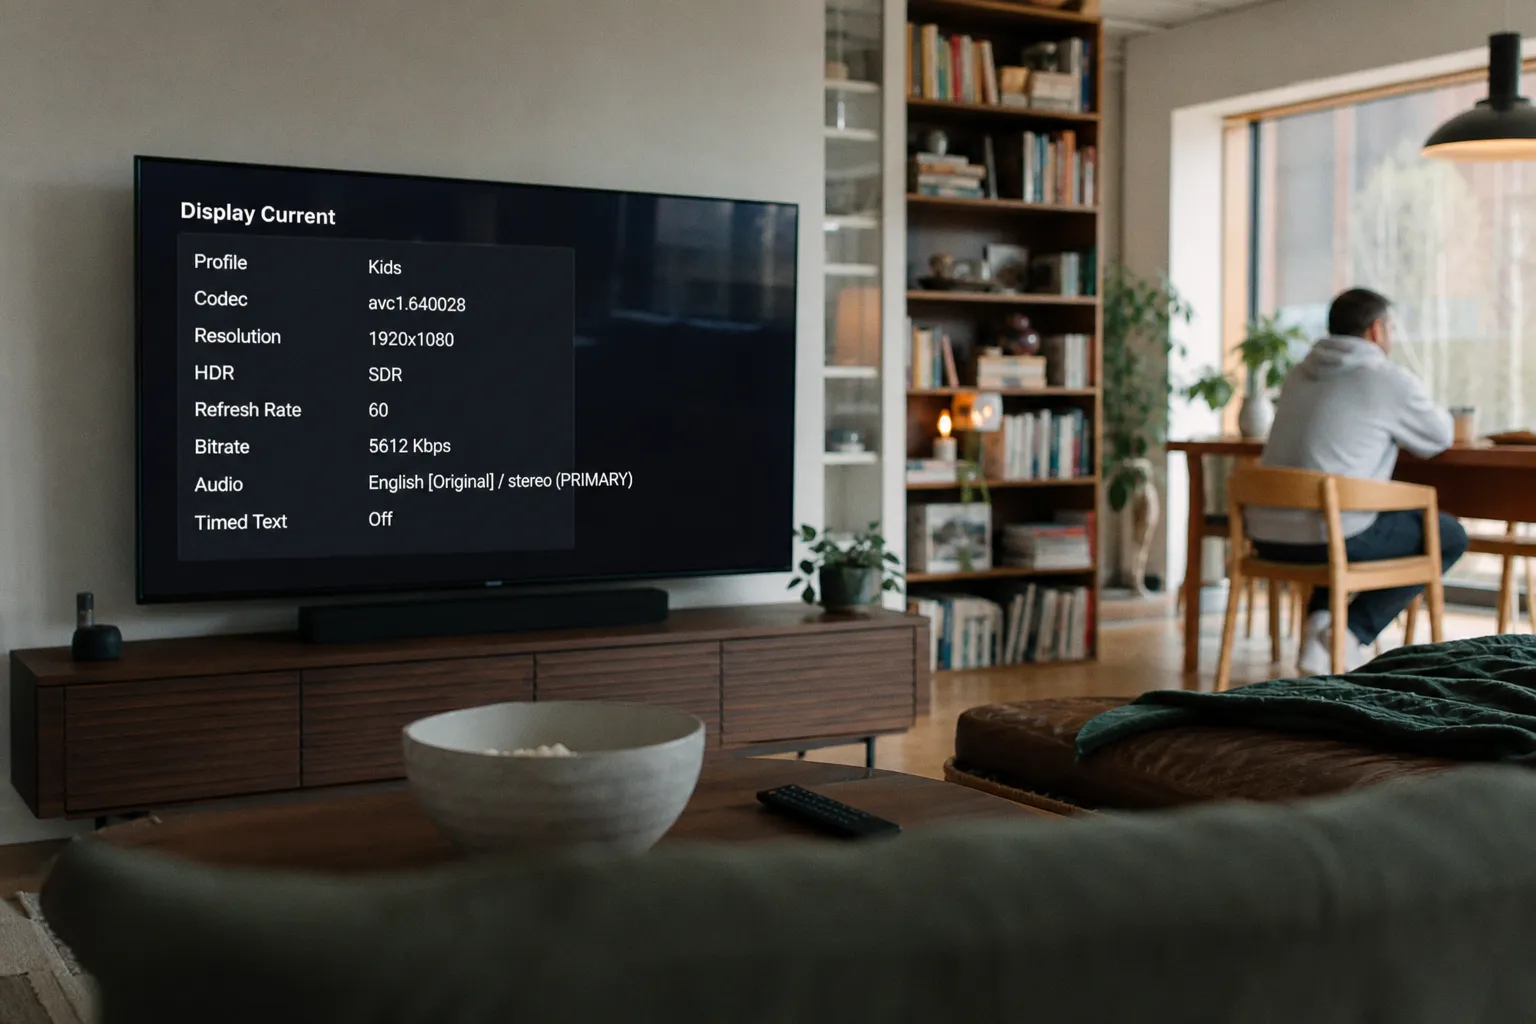
On many smart TVs and streaming devices — Roku, Apple TV, Fire TV devices, and similar boxes — Netflix has a Display Current style diagnostic readout. The exact button varies because remote makers enjoy making simple things irritating. Try the Info or Display button first. On some remotes, you may need a device-specific button or app menu path.
When it works, the overlay can show useful live data such as:
- Current video resolution.
- Video bitrate.
- Buffering information.
- Playback state.
- Sometimes audio and network-related details, depending on device.
On a browser, Netflix is cleaner. Start playback, then press:
Ctrl + Alt + Shift + D
That opens Netflix’s diagnostic overlay in supported desktop browsers. You should see technical playback data including video bitrate, resolution, and buffering information.
I use this shortcut because it removes guesswork. If Netflix says the stream is 1080p and shows the bitrate moving during playback, I can stop arguing with my eyes and start comparing actual stream behavior.
My Netflix test routine
Do not test with a single paused frame. That tells you almost nothing. Bitrate is variable. It rises and falls based on the complexity of the image. A static shot of a wall is cheap to encode. A stormy night fight with smoke, rain, and camera movement is not.
My basic Netflix run looks like this:
1. Use a wired connection if possible. Wi-Fi testing is useful later. First, remove Wi-Fi as the excuse.
2. Start a title known for difficult scenes. Dark scenes, grain, fast camera moves, and heavy visual effects are better than clean studio shots.
3. Let playback settle for at least a minute. Adaptive streaming often ramps up after the first few segments.
4. Open the diagnostic overlay. On browser, use Ctrl + Alt + Shift + D. On TV devices, try Info or Display.
5. Watch bitrate movement, not just one number. If it jumps, dips, and recovers, that is normal. If it stays low while the image falls apart, that is the problem.
6. Repeat the same scene on another device. A TV app, streaming stick, and browser can behave differently.
Netflix’s tool does not make the ad-supported tier secretly premium. The Standard with ads tier is still a 1080p product. But at least Netflix gives you enough visibility to see whether you are getting the stream quality the tier can provide.
That is the difference between “the picture looks soft” and “the stream is capped at 1080p and currently running at a lower video bitrate than expected during a complex scene.” One is a complaint. The other is evidence.
Workarounds for monitoring Max stream quality without native tools
Max is where the testing gets ugly.
Max does not offer a standard, native, user-facing bitrate display inside the app for most consumer devices. There is no universal “stats for nerds” button. Do not waste an hour hunting for one on your TV remote.
If you are using Max Ad-Lite, you should assume a 1080p ceiling unless the service and title clearly say otherwise — and 4K UHD is tied to the Ultimate Ad-Free tier. But if you want to estimate stream behavior, the desktop browser route is the most practical path.
On Chrome or Edge:
1. Open Max in the browser.
2. Start the video.
3. Press F12 to open Developer Tools.
4. Go to the Network tab.
5. Filter by Media or XHR.
6. Watch the media segment requests load while playback continues.
7. Estimate bitrate from segment download sizes and timing.
This is not as clean as Netflix’s overlay. It is more like looking under the floorboards while the house is moving. You are watching chunks of video arrive. By comparing segment size with segment duration, you can estimate the rate of data delivery.
I do not recommend this for casual users who just want to watch a movie after work. I do recommend it if you are deciding whether Max Ad-Lite is good enough for your main TV.
The rough math for Max browser testing
You are looking for media segments. If a segment is, for example, several megabytes and represents a few seconds of video, you can convert that into an approximate megabits-per-second figure. The formula is simple in concept:
- Segment size in megabytes.
- Convert to megabits by multiplying by 8.
- Divide by segment duration in seconds.
- Repeat across multiple segments.
- Average the results loosely, not obsessively.
I’m not giving a fake “typical Max bitrate” number here because exact values fluctuate. The service uses variable bitrate streaming. Scene complexity changes. Network conditions change. Browser behavior changes. Ad load can complicate the timeline. Even the same title can behave differently across devices.
That uncertainty is the point. Max does not hand you the clean number. Netflix mostly does. So Max testing requires either patience or acceptance.
If you want a broader sanity check before spending a night inside browser tools, I sometimes cross-check general streaming and entertainment coverage from sources like Amajing World to see whether a service has had recent app or platform changes that could affect the viewing experience. Then I test the actual stream myself. News is context. Bitrate is evidence.
Netflix vs Max cheap tiers: which is easier to verify?
For stream-quality testing, Netflix wins by a mile. Not because its cheap tier is magically sharper. Because it gives you better visibility.
| Testing job | Netflix cheap tier | Max cheap tier | My verdict |
|---|---|---|---|
| Confirm resolution ceiling | Straightforward: Standard with ads is 1080p | Straightforward: Ad-Lite is generally 1080p | Tie |
| See live bitrate | Built-in diagnostics on browser; many devices support display readouts | No normal in-app consumer tool | Netflix wins |
| Test on living-room hardware | Possible with Info/Display overlays on many devices | Mostly indirect; app does not expose bitrate | Netflix wins |
| Estimate browser stream behavior | Ctrl + Alt + Shift + D | F12 Network tab and manual segment watching | Netflix wins |
| Explain results to a non-technical person | Easy: “Here’s the overlay” | Hard: “Here are media chunks in DevTools” | Netflix wins |
That last row matters. If I am helping someone cut a bill, I need repeatable proof. I don’t want a ritual that requires pausing dinner, opening Chrome DevTools, filtering requests, and doing arithmetic just to decide whether a show looks bad.
For Netflix, the test is approachable. For Max, it is a workaround.
Interpreting variable bitrate without fooling yourself
Bitrate is not a fixed speedometer. It is adaptive. It changes constantly.
This is where people get bad results and draw loud conclusions. They open a diagnostic panel, see one low number, and declare the service broken. Maybe it is. Maybe the scene is simple. Maybe the stream is still ramping. Maybe the Wi-Fi is choking. Maybe the device app is stale. Maybe the plan is capped and behaving exactly as designed.
You need a cleaner method.
What I look for during a real test
- Ramp-up behavior. Does the stream start low and improve within 30 to 90 seconds? That is normal adaptive streaming behavior.
- Stability. A good stream can fluctuate. A bad stream keeps falling during scenes that should hold quality.
- Scene response. During fast motion or dark gradients, the bitrate should have room to climb. If it does not, compression artifacts show up.
- Device differences. The same service may look different on a built-in TV app versus an Apple TV, Roku, Fire TV device, or browser.
- Network headroom. A speed test alone is not proof. But if the connection is weak or inconsistent, bitrate drops will follow.
- Plan ceiling. A 1080p ad-supported plan will not deliver 4K detail. Stop expecting it to.
I also test at the screen size that matters. A cheap tier may look fine on a bedroom TV and mediocre on the big living-room panel. That is not hypocrisy. That is pixel density and viewing distance doing their job.
If your test does not include motion, shadows, and at least two devices, you are mostly testing your patience.
The worst testing habit is comparing a cheap streaming tier to a memory of how something “should” look. Use the same title. Same scene. Same display mode. Same network. Then compare.
Why resolution is not the only metric for visual fidelity
Streaming companies sell resolution because it fits in a pricing table. 1080p. 4K UHD. Clean labels. Easy upsell.
Bitrate is less marketable because it is messy. It varies by title and scene. It depends on encodes and delivery. It is not a single promise slapped onto a plan card.
But bitrate is often the thing your eyes complain about first.
Low bitrate can create:
- Banding in gradients. Skies, smoke, and dim walls show ugly steps instead of smooth transitions.
- Blockiness in dark scenes. Black areas turn into pulsing patches.
- Motion smear. Fast camera movement loses detail.
- Texture loss. Hair, fabric, rain, and film grain get scrubbed flat.
- Edge noise. Fine outlines shimmer or crawl.
The cheap tiers are vulnerable because they sit at 1080p and often use tighter delivery economics. That does not mean every cheap stream is bad. Modern codecs can do a lot with limited data. But there is no free lunch. When a service pushes ads, compresses delivery costs, and withholds 4K for a higher tier, the picture quality ceiling is part of the business model.
This is also why “it says HD” is not enough. HD can be clean. HD can be abused.
On Netflix Standard with ads, the best-case result is a solid 1080p stream that holds up on moderate screens. On Max Ad-Lite, the best-case result is also a solid 1080p stream — but you have fewer tools to prove what is happening when it does not look right.
The cheap-tier decision: what I would actually pay for
Here is the cost-saving angle. Do not upgrade blindly just because a stream looks soft once. First, test.
If you mostly watch on a phone, tablet, laptop, or smaller secondary TV, the cheap tiers can be perfectly rational. A 1080p cap is not a disaster at those sizes. If your network is stable and your eyes are not three feet from a huge panel, the savings may beat the sharper image.
If your main screen is a large 4K TV and you watch cinematic shows, sports, action, or dark premium dramas, the cheap tiers are easier to expose. That is where the missing bitrate and missing 4K option become real. Not theoretical. Visible.
My practical breakdown:
- Choose Netflix Standard with ads if you want the lower bill and still want a decent way to verify stream quality. The browser overlay alone makes it easier to troubleshoot.
- Choose Max Ad-Lite if you mainly care about the catalog and can live with a 1080p ceiling. Just know that diagnosing quality issues is more manual.
- Upgrade Netflix to Premium if your main concern is 4K UHD access and your screen is large enough to show the difference.
- Upgrade Max to Ultimate Ad-Free if you want 4K UHD content from Max and do not want the Ad-Lite ceiling making the decision for you.
- Do not upgrade either service if your issue is actually bad Wi-Fi, an overloaded streaming stick, or a TV picture mode that ruins everything.
That last point saves money. I have seen people upgrade plans when the real culprit was a bargain router in a cabinet, a five-year-old streaming stick, or motion smoothing making compression look worse.
My verdict
If your goal is how to check test video bitrate on Netflix and Max cheap TV plans, Netflix is the cleaner service to audit. Use Ctrl + Alt + Shift + D in a desktop browser, or try the Info/Display route on supported TV devices. You can see enough data to make a grounded decision.
Max is less cooperative. On the cheap Ad-Lite tier, you are generally working under a 1080p ceiling, and there is no standard in-app bitrate readout for most consumer devices. Browser Developer Tools can estimate what is happening, but it is not friendly and it is not a proper consumer diagnostic panel.
My buy-or-skip verdict: Netflix’s cheap tier is easier to justify if you care about proving what you are getting. Max’s cheap tier is acceptable only if the catalog matters more than transparent quality testing. For a big 4K living-room setup, I would not treat either cheap tier as the default. I would test first, then pay up only if the evidence — not the marketing — says the picture is being held back.